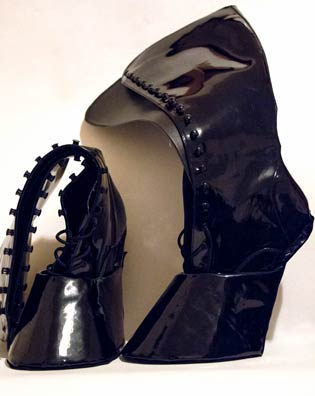
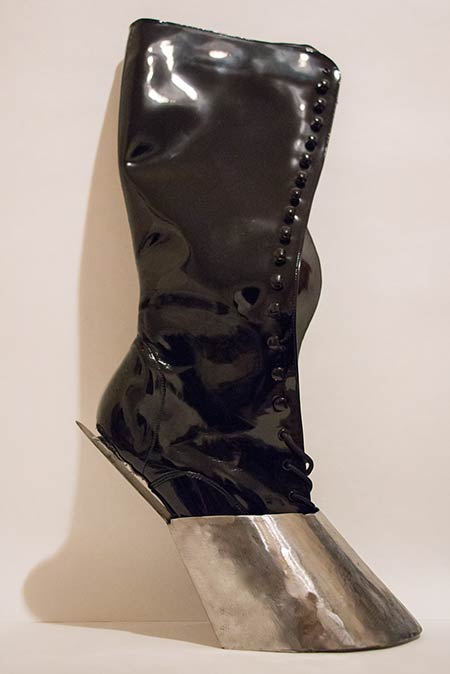
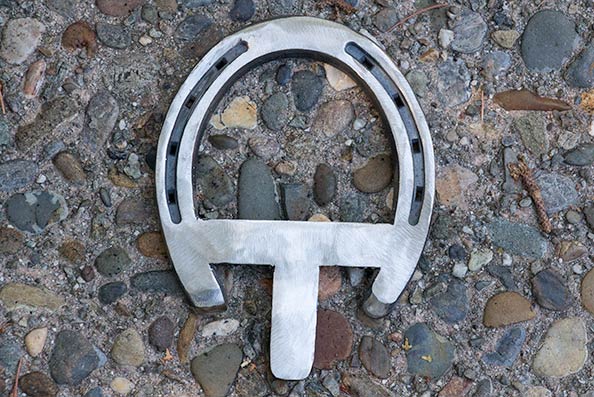
The hoof boots I made (shown prior to adding horseshoes). This article will explain how I constructed them.
The hoof boots I made (shown prior to adding horseshoes). This article will explain how I constructed them.
After much procrastination, my hoof boot project is complete (not perfect, but complete).
What hoof boot project, you say?
Well, I'm glad you asked. As some of you know, the Reactor hoof boot has been discontinued for several years now. However, the styling of that boot, which entailed the boot "upper" being inserted into the "hoof," held great aesthetic appeal for me.
Thus, last year I set out to make a similarly styled boot. I figured it would be nice to have a backup pair in case of damage (given as much as I use my original pair, this seemed like a prudent idea). Today, I'm declaring them done, and I would like to share with you how I made them.
The boots I made are not nearly as refined as the originals, but they're functional and pretty decent looking. If I made a second pair, I could do much better. With that in mind, I'm including suggestions on how I would change the processs if I were making another pair.
This is my first real DIY project, and I lack any experience in working with metal or leather. The last thing I made was a crooked wooden toolbox that had nails sticking out of it, and that was nearly 30 years ago in preschool. My point is: if I can make a pair of boots that aren't total crap, you can too. However, if you're not familiar with any of the tools or techniques, I would advise you to learn about them from a reputable source and to practice with them a little before using them to make something you care about.
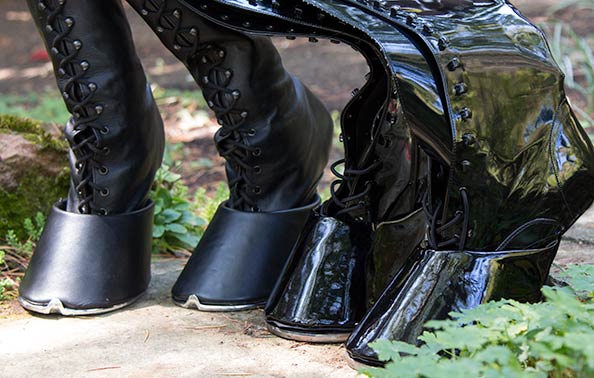
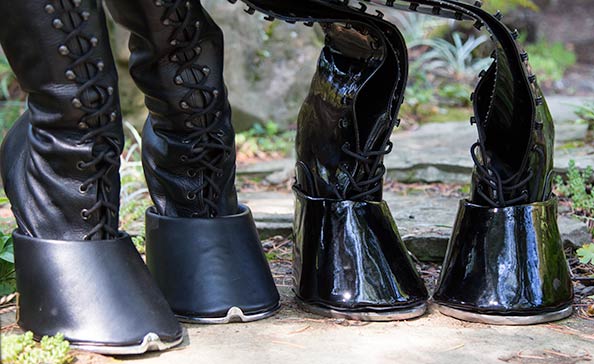
My completed hoof boots (right) in patent leather complement my black leather Reactor boots (left). They're not perfect, especially in reards to the leather covering, which has some jagged edges, but I don't think they're too bad for a first go.
Also, if you're going to make a pair of these hoof boots, I would advise that you read through all the steps outlined below. Boring, I know, but I don't want you to get part way through the project before discovering that some step may not work based on the tools, time, or space available to you.
Disclaimer: I do my best to provide accurate information, but I am not an expert, and in fact have no previous experience in making footwear or working with metal. I'm providing this information merely as a guide to how I made my own pair of boots and disclaim any liability for any damage to personal property or injury incurred from use of the information provided. I cannot guarantee that any boots made by following this guide will be suitable for use as actual footwear.
I have uploaded a set of tracings I made of each part of the boots. It is a PDF with four pages (one page for the left hoof wall, one page for the right hoof wall, one page for both foot plates, and one page for both bases). When printed on 8.5" x 11" paper, they are actual size stencils you can use. However, use them with the caveat that they are not perfectly correct, so you may have to remove a bit of excess metal at the end. However, they're pretty close (these are the same tracings I used to make my own pair of boots).
Because the stencils are not perfectly accurate, I highly advise building a construction paper (a type of thick paper, similar in thickness to post cards) mockup of the hoof portion. I will go over how to do this below. When you make such a mockup, you can determine if the sizes and shapes are correct and that everything fits together as it should. If for some reason something doesn't fit well, this step will give you the opportunity to make any needed adjustments to the dimensions of the hoof before moving on to metal.
Let's start with a brief overview of the boot.
Overview of the Hoof Boot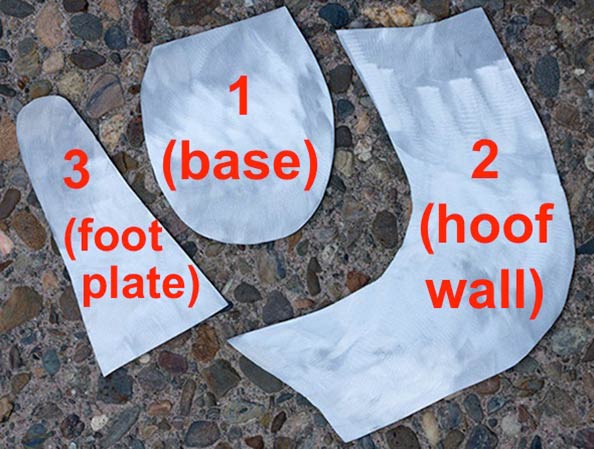
The hoof portion of the boot is composed of three parts of steel welded together. I call them the base (#1), the hoof wall (#2), and the foot plate (#3).
The foot plate of the Reactor boot is actually made from two sections of metal. They are completely identical and positioned flush against each other. The purpose of doubling up the foot plate was likely to increase its strength. The foot plate is the only part of the hoof that will take any real stress, and even it will not take too much if the wearer walks on the balls of his feet and doesn't lean back or try to put weight on his heels.
I tried constructing the hoof plate like this initially, but I changed my mind after I had trouble welding the second foot plate on top of the first one. At that point, I decided to use a single piece of steel twice as thick. However, the dual foot plate construction employed by the Reactor boot would be my recommended method.
Making the foot plate out of two pieces of 16 gauge (approx. 1/16") steel means you don't have to buy two different thicknesses of steel sheet. It also makes bending the foot plates easier (1/8" steel is much more difficult to bend than 1/16"), so I would recommend going with the original design if possible. However, I personally found it a bit of a pain to weld the two pieces perfectly flat, and given my general lack of patience, I wound up remaking the foot plates out of a single piece of 1/8" steel. The choice is yours.
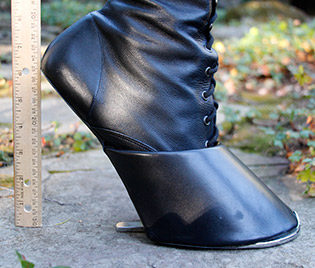
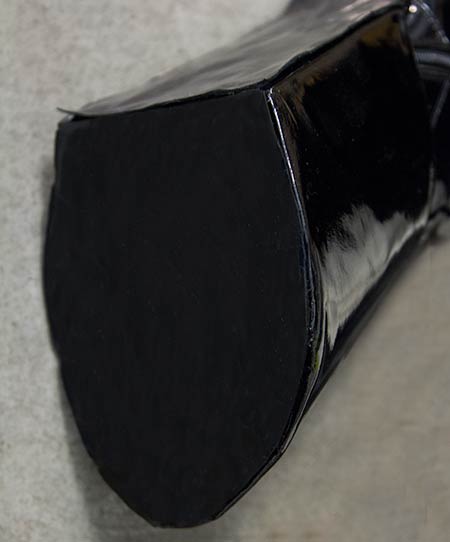
Side view of my Reactor hoof boot (men's size 11). It would be a 6 inch heel if it had heels.
The boot is a heelless boot, equivalent to about a 6 inch heel (see photo at right).
We're going to make the hoof boot in four stages. The first stage is mostly prepartory: we'll remove the heels from the boots that will serve as the uppers, then we'll construct a hoof out of construction paper. Finally, after we confirm that the boots fit inside the hoof, we'll create a concrete cast (using the construction paper mockup as a mold), which will facilitate easier shaping of the metal in subsequent steps.
In the second stage, we'll trace the outlines for each part of the hoof onto steel sheet, cut them out, and shape them (primarily the hoof wall, but to a lesser extent we also have to bend and slighly curve the foot plate(s)). In the final part of the second step we'll weld all the pieces together to form the hooves that make up the core of the hoof boot.
In the third stage, we will glue the boot into place inside the hoof, then we'll cover the hoof in leather.
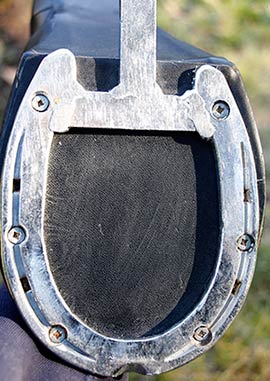
A horseshoe is attached via 6 screws to the bottom of the hoof portion of the boot. Note also the balancing bar. Addition of the balancing bar and attachment of a horseshoe to the boot will both be covered in the optional fourth stage below.
In the fourth, and final, stage, we will add the balancing heel bar to a standard horseshoe followed by drilling holes in the horseshoe (and the bottom of the hoof boot) so that it can be attached via screws. Alternatively, the horseshoe can be attached to the boot without drilling holes in the horseshoe if the screws are small enough to fit through the horsehoe's existing nail holes.
The hoof boots may be used without adding a horseshoe, either by walking directly on the leather covering on the base of the hoof, omitting the addition of leather to the bottom of the hoof (thus walking directly on the steel base), or by using a bio-horse hoof boot designed for barefoot/unshod horses (or using a Davis bio-horse boot).
Another option is to opt for rubber horseshoes. This has the benefit of giving the wearer better traction on smooth or slippery surfaces such as hardwood and concrete while also causing less damage to floors. However, even when using a rubber horseshoe with the hoof boot, it is recommended that the shoes are attached with screws (as opposed to glue), necessitating holes being drilled through the rubber and base of the hoof.
What You'll Need: Materials and ToolsThe consumables I used for the project are as follows (notes added below each item when relevant for what I actually used and/or what I think would be better in retrospect):
If you don't buy the 1/8" steel, instead using two pieces of 1/16" for the foot plates, then figure on spending about $80 for random supplies + $15 for horseshoes + $75 for the boots = $170. I'd bet you could cut this cost way down if you shop around - I sort of just bought stuff as I discovered I needed it and didn't really look around for the best deals.
By far, the biggest individual cost was the pair of knee high boots with 6" heels that I cannabilized into the uppers for the hoof boot. It was hard enough to find such a boot in a mens size 11 nevermind that I also wanted them to roughly match the Reactor uppers in the style of lacing. Anyway, the best price I could find was $75 from Amazon. eBay and Craigslist are your friend here.
If you don't mind tinkering with the design (easily done if you make paper mockups), you could use a less extreme heel (5" or perhaps even 4"), which may be less expensve. Also, if you have a smaller foot than me, you may also find more options available to you. Likewise, if you're less picky about the style of the upper, you'll have more options to choose from, some of which may be less expensive.
The tools I used for the project were:
If you don't already have a welder and can't borrow one from a friend, see if your area has a shop or shared workspace where you can use their tools for a fee (sometimes even for free). If not, check used listings on Craigslist or similar. Aside from the welder, most of the tools aren't terribly pricey, and you probably have or can borrow many of the items. You can substitute a simple propane blowtorch for the propane forge/acetylene torch, the latter just makes things faster.
Stage 1: Removing Heels, Construction Paper Mockup, Concrete CastAs it turns out, heels are affixed pretty securely to the footwear they adorn. They are attached, at least in the boots I purchased, by a big (about 1 inch x 1.5 inch) rectangular metal clip with four prongs/teeth (seen in the photo below in the nose of the pliers) like an oversized staple through the base of the boot into the heel. Additionally, there is also adhesive holding everything in place.
Unfortunately, I don't have a great technique or trick to speed things up. My method involved using a blade (e.g. from an X-acto knife) to cut all the way around the leather that covered the heel at the junction with the base of the boot.
After cutting through the leather (or whatever material is used on your boot) coating right where the heel is attached to the sole of the boot, I switched to a cheap flathead screwdriver, which I wedged between the top of the heel and the sole of the boot and used it to pry the two apart. I worked my way around the bottom of the boot several times, wedging the screwdriver deeper with each round. Gradually, this pushed the heel apart from the boot. This worked for me, and it resulted in a fairly clean removal of the heel, but it required several iterations and fair amount of patience.
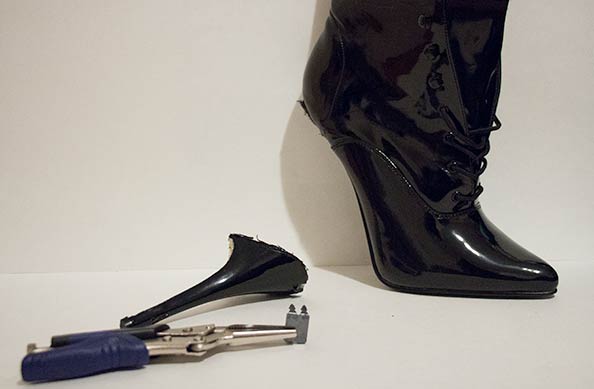
Remove the heel from each of the boots. These will become the "uppers" for the hoof boots. The heels are attached via a metal clip, like an oversized staple (about 1 x 1.5 inches), pictured above in the jaws of the pliers. It may take some time and patience to gradually work them off.
Once the heels have been removed from both boots, it's time to create the construction paper mockup of the hooves.
Use the stencils from the PDF to trace the patterns of each part onto construction paper. Also, copy the notes about the orientation of each piece (e.g. make a note of which side is inside, and which corner is which for the hoof walls). Cut the pieces of construction paper out, then align the bottom corners of the hoof wall with the back corners of the base.
Align the bottom corners of the hoof wall (corners on longest side) to the back corners of the base, and use hot glue to glue them together.
Starting in one corner, use a hot glue gun to partially glue the hoof wall to the base. Add glue for several inches out from the corner, then stop and glue the other corner of the hoof wall to the base in a similar manner. After both corners are aligned and fixed with glue, apply hot glue along the entirety of the inside junction the hoof wall makes with the base. Make sure you have a good seal because in a few steps we'll add concrete to the hoof and don't want it to leak out.
We are doing it this way because the base will likely be a little larger than the curved hoof wall, and I found it easier to shave any excess material off the base, than to try to add additional material to the rear of the hoof wall.
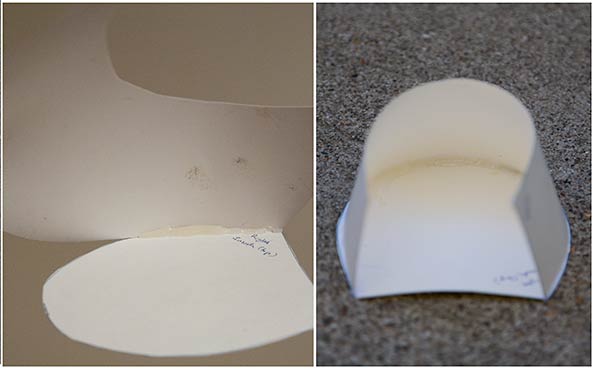
Glue together the construction paper mockup of the hoof wall to the base using hot glue. Start by gluing one corner of the hoof wall to the base (left pane). Apply glue a few inches inwards from the corner. Next glue the other corner of the hoof wall to the other corner of the base in a similar manner. With the corners aligned and glued, apply hot glue all the way along the junction the hoof wall makes with the base (right pane). Make a complete seal. We will soon fill it with concrete and do not want it to leak.
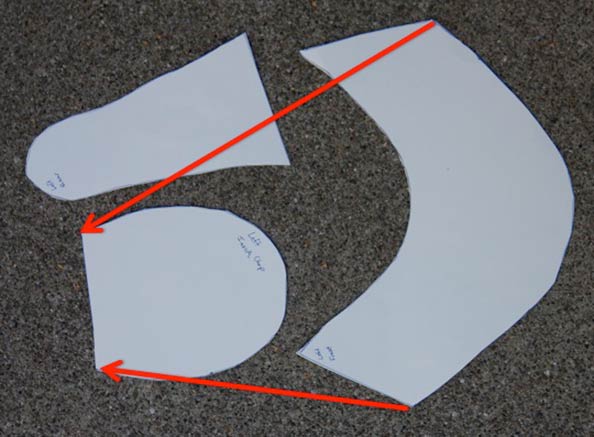
After you have glued the hoof wall to the base, you may notice that with the corners aligned, the base protudes a little from under the hoof wall. This is acceptable and is a product of the stencils not being perfectly accurate. In the final metal hoof, these extra bits can be trimmed off easily with a grinder.
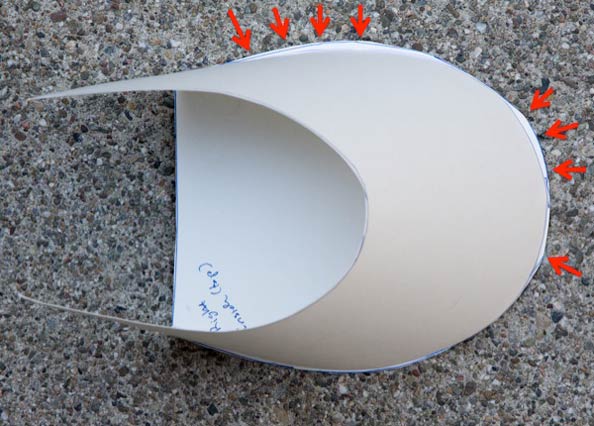
When the bottom corners of the hoof wall are aligned with the back corners of the base plate, you may find that the base plate is a little wider than the hoof wall and sticks out as shown here (red arrows). This is acceptable. Later, after you weld everything togther, you can trim off this extra material.
Now glue the foot plate to the back sides of the hoof wall and to the base at the bottom. Again, make sure you apply glue along all edges/junctions to form a complete seal.
Glue the construction paper foot plate to the rest of the mockup hoof. The foot plate may be a little wide in places, but that is okay. As mentioned earlier, we can easily grind off a little extra metal.
Hopefully, everything fit together fairly well. It is fine if the foot plate or the base has a little extra material and protudes out a little. We can easily grind off a little extra metal. However, if any of the parts are too short (e.g. the hoof wall extends over/past the base), this can be problematic. It is more difficult to add additional metal.
Now is the time to make any adjustments to the stencils. So, if you find your base or foot plate to be to short or not wide enough, go back to your stencils and make a slightly larger version. Make a new construction paper mockup with the adjusted stencils and confirm that neither the base nor foot plate is too small before proceeding.
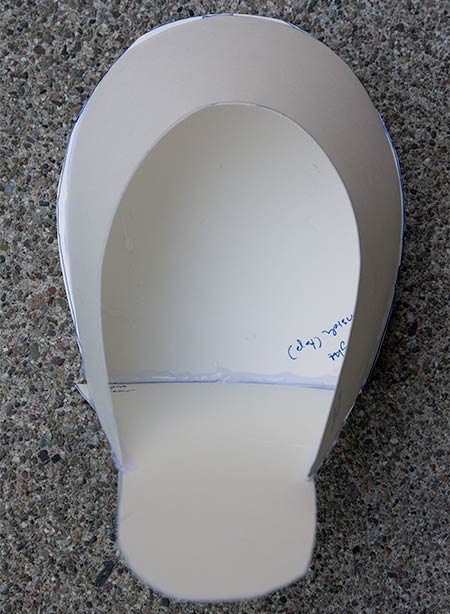
With the construction paper mockup glued together, you might notice that the top of the hoof seems a little narrow. This is indeed the case (at least for my size shoe). So, we will widen the opening at the top of the hoof with a couple toothpicks.
Measure the width at the top of the hoof, then measure the bottom of the boots to see how wide the opening needs to be to allow the boots to fit inside. Now, physically place the boots inside the hoof and measure how much top of the hoof needs to be widened to allow the boots to fit inside.
Grab a couple toothpicks for each hoof and glue them end to end such that the total width is a bit longer than what's needed to widen the opening. When the glue holding the toothpicks together cools off and hardens, insert the (now super long) toothpick into the hoof, position it so that the opening is at least as wide as needed to allow the boots to fit inside (but not so long that it looses its hoof shape or looks ridiculous), then glue the toothpick in place to the inside of the hoof at both ends.
You will likely need to widen the top of the hoof wall, an inch or so from the foot plate to fit a boot inside it (possibly not if you have a smaller shoe size).
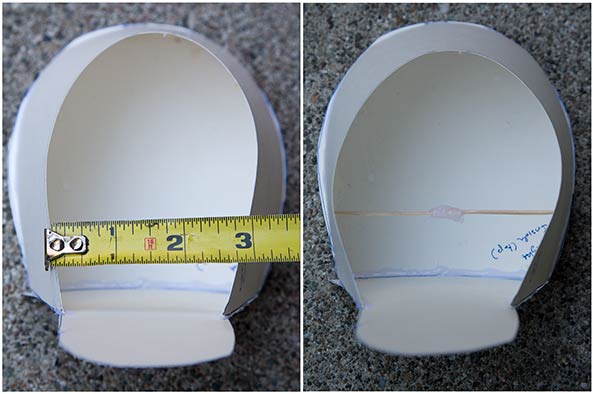
When the glue holding the toothpicks in place inside the hoof has cooled, measure the width and length of the top of the hoof. Go back to your boots and measure the dimensions of the foot portion. Make sure that your boot will fit into the opening. If not, widen (or narrow if appropriate) the opening by repositioning (and then re-gluing) the toothpicks.
Once you're satisfied that your boot will fit into the top opening, it is time to add concrete. Leave the toothpicks in place, and very carefully add concrete until the hoof is full. Wear gloves and do this outdoors in a place where you can contain the mess (e.g. place the hoof inside a bucket).
We want a concrete cast of the final shape of the hoof so that we can more easily shape the metal (reardless of whether you are shaping it hot or cold).

After you have widened the top of the hoof, confirm that the boot fits inside the hoof. If so, then create a cast by pouring concrete into the construction paper hoof mockup (this may get messy, so do it inside a bucket or other container). Leave the toothpicks in place (to maintain the correct width) and carefully pour the conrete around them. When dry, remove the construction paper.
After the concrete has set (I gave it a couple days to harden), it's time to move on to the next stage.
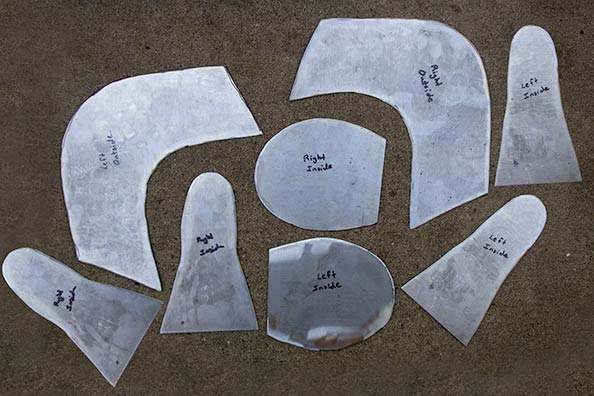
Stage 2: Making the Metal HoofUse the finalized tracings (fine tuned above when you made the construction paper hoof) to trace the parts onto the 16 gauge steel sheet.
Important note: the foot plate in the Reactor boot is actually constructed of two identical pieces of 16 gauge steel making it double thickness for added strength due to the load it must bear. I initially emulated this design, but later on I changed my mind and decided to go with a single piece of 1/8 inch steel (for the foot plate only). So, please bear this in mind when reading the rest of this article and looking at the photos illustrating the steps. It may appear that I lost two of the foot plates during the process, but I did not. I just used a single piece of double thicknes.
On the 16 gauge sheet steel, trace the outline of each part of the hoof portion: the 2 x foot plates per boot, the hoof wall, and the base. For a pair of boots, this will be a total of 8 parts (unless you elected to use a single foot plate per boot of 1/8", then you'll have only 6 pieces per pair of boots).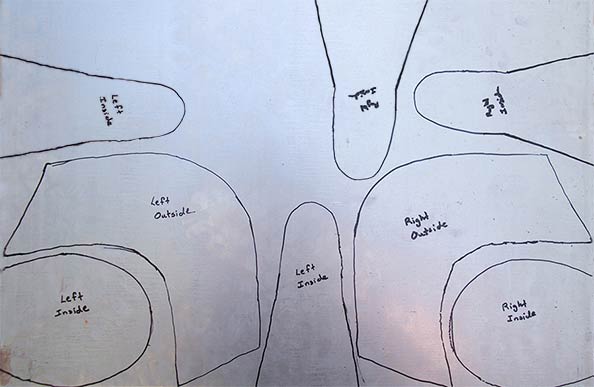
Now that you have the outlines traced onto the steel sheet, go ahead and cut them out using whatever method you prefer (or have available to you). I simply used an angle grinder with a thin cutoff disc, but you can use a plasma cutter (preferred method if available to you) or even hand shears (though 16 gauge is right at the limit of what you want to cut by hand and will likely be a pain to cut manually - if you elected to make a single foot plate per boot out of 1/8" steel, you can forget about cutting them out by hand unless you're Dr. Zoidberg):
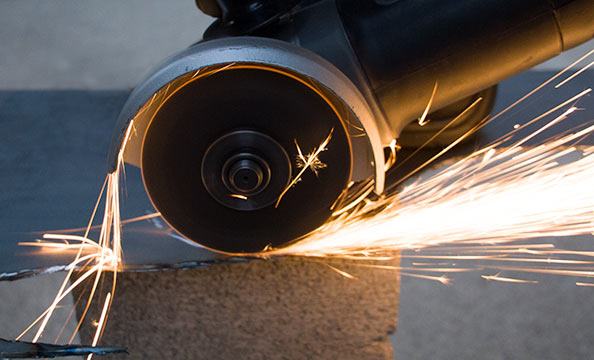
Cut out the tracings from the sheet metal with whatever method you prefer (I used an angle grinder with a cutoff disc).
Next, clean up the parts you just cut out. If you used an angle grinder to cut them out, a quick once over with a wet cloth or paper towel will remove all that excess steel dust. Then, slap the flap disc on the grinder and deburr the edges so they don't cut you. This will also make a smoother surface for better welding.
After cutting the parts of the hoof out of the sheet metal, clean up and smooth the edges (I used a 36 grit flap disc on an angle grinder) both so it doesn't cut you, and for a better weld later.
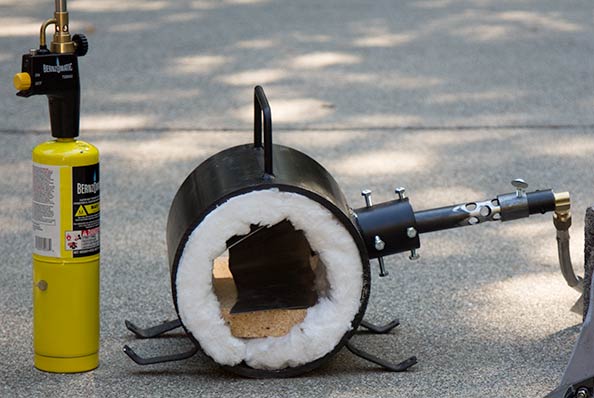
With the pieces cleaned up and deburred, you'll want to bend the hoof wall into the correct shape. This can be a bit tricky. After much trial and error, I have discovered what people have known for millenia: that hot bending and shaping of steel is by far the best way to go if at all possible. To do this, you will need to heat up the hoof wall using either an acetylene torch (with rosebud tip), a propane torch (ideally using a wide tip, not the standard pencil tip), or a propane forge. I ended up using the latter for major bends and shaping, and a propane torch to perform localized shaping/fine-tuning.
After trying various methods of bending the steel hot and cold, I ultimately found I got the best results when I used a propane forge to heat up the steel of the hoof wall.
You can cold bend the hoof wall, but this will be more time consuming, and you will need to take care not to overly crease the steel, which may impede your ability to get a smooth curve.
The hoof wall is curved, so you will need to bend the steel. This can be done without heating, but I found it to be much easier to achieve smooth, accurate curvature when I bend it hot. I have used both a wide-tipped propane torch and a propane forge, both with good results.
Once the steel hoof wall is sufficiently hot from whatever method you chose, USING TOOLS, wrap it around the concrete cast of the hoof you made earlier. This will get it into approximately the correct shape.
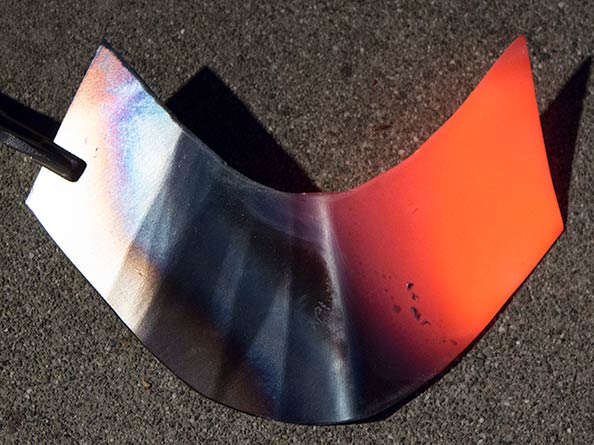
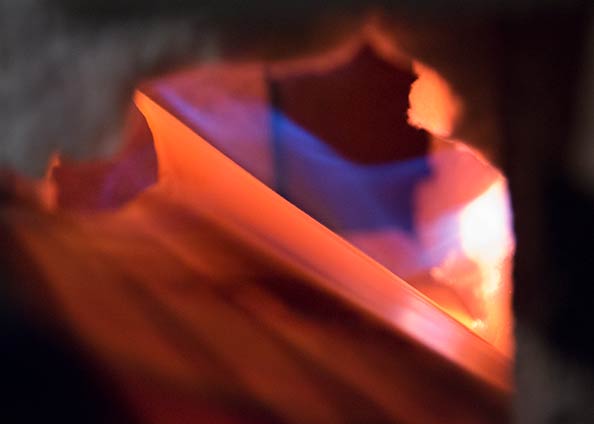
The hoof wall partially heated for bending. Note that the right side of the hoof wall has a nice orangish yellow color to it. In my (very limited) experience, when the metal looks like this, it is very easily shaped, behaving almost like a hardish clay. If you're hot bending the hoof wall, when you get it to this temperature/color, you should have no issues getting the metal to conform to the hoof shape of the concrete cast you made earlier.
Throw it back into the forge (or use your torch to reheat it) and then bring it back to the cast and, using a small hammer, hammer it against the cast to make it conform to the hoof shape. Repeat until the metal conforms well to the cast and is in the proper shape.
Bend the hot steel hoof wall around the concrete cast of the hoof made earlier. Once the curve is approximately correct, use a hammer to conform the metal to the shape of the hoof by hammering it against the cast. Reheat as necessary to get it shaped as precisely as possible and smooth out any creases. You will likely chip the cast in the process - this is fine: it should last until you're done, but you can always make another one.
This was the most difficult part of the process for me. I went through a few metal hoof walls (this was before I used the concrete cast). The concrete cast will not be perfect, so after conforming the hoof wall to the cast, you may have to do a little bending and hammering to get the hoof wall bent smoothly and shaped like a hoof.
Periodically, place the hoof wall over the base, alinging its bottom corners to the back corners of the base, to see how close the curvature follows the curvature of the base. It should be pretty close with only a little excess material from the base peeking out (remember how the construction paper mockup looked). Also, measure the width of the top of the hoof. It needs to remain wide enough to allow the boot to fit inside.
It can be incredibly frustrating because you're curving it along two axes to get the curve around the foot while also keeping the top wide enough to fit a boot. These two curvatures are fighting each other: as you make the hoof wall curve around the base, the top curves too much, making it too narrow to fit a boot inside. Conversely, as to try to widen the top, the bottom of the hoof wall becomes wider than the base. The key is perseverance. Keep hammering it against the concrete cast, and you should get very close to what you want.
If, like me, you don't have any previous experience in DIY or metalworking, you'll need a lot of patience and the willingness to screw up and start over. Just keep at it, and eventually you'll get it shaped correctly.
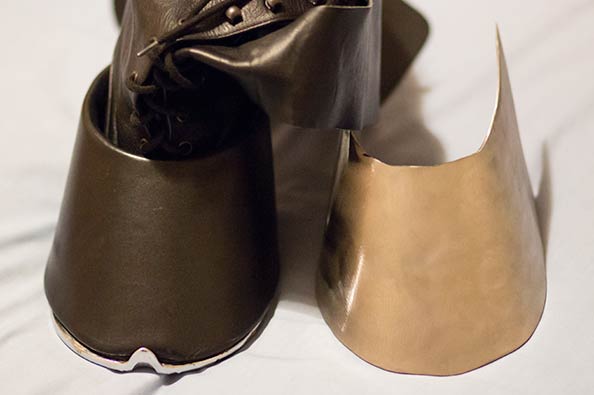
Finished hoof wall, curved appropriately, in comparison to the Reactor.
With the hoof wall shaped correctly - make sure it conforms very well to the cast you made - it's time to move on to welding everything together. Before you weld the hoof wall to the base, make sure that the bottom of the hoof wall (the edge you'll be welding to the base) is level. Set it on the base, on a level surface, and make sure it sits flat with no gaps between the hoof wall and the base. If it's not sitting level on the base, use the grinder with a flap disc to gently shave off a little metal on the bottom of the hoof wall until it's level and sits flush with no gaps on the base.
Once the two parts fit together well, go ahead and weld the hoof wall to the base. Weld them together on the inside (or what will soon become the inside) of the hoof. Weld all the way around the inside junction between the hoof wall and the base.
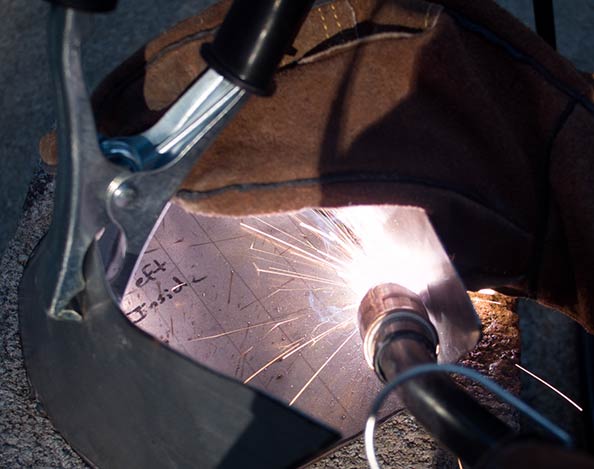
Once you have curved the metal of the hoof wall appropriately, weld it to the base plate (weld on what will become the inside of the hoof, not the outside).
After you finish welding the two pieces, use the flap disc on the grinder to smooth out the outside of the hoof at the junction you just welded. There will likely be a little discoloration from the heat that you can remove with a quick once over from the flap disc. This will allow you to perform a quick check of the integrity of the freshly welded joint, plus it's nice to give the junction a seamless appearence.
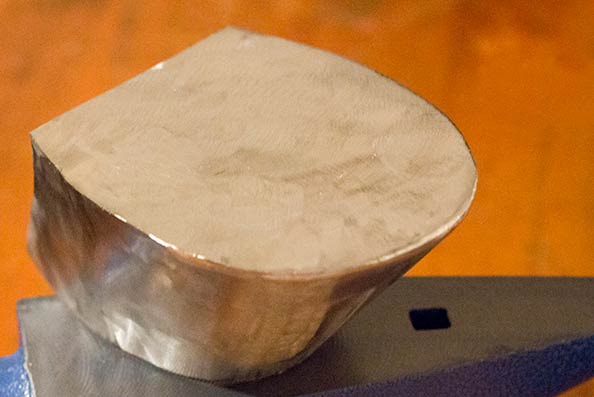
The hoof wall welded to the base of the hoof with the welds cleaned up.
After you have completed welding the hoof wall to the base, and before you weld on the foot plate (or dual foot plates if you chose to use 16 gauge for the foot plate), it's a perfect time to make sure that the boot will fit into the hoof. Place the boot into the hoof, and push it all the way forward. Now, hold the foot plate against the back of the hoof to mimic its placement in the completed hoof. The foot plate should be nearly flush with the sole of the boot (a little extra room is probably fine, but obviously, too little room is not good).
Confirm that the boot fits into the hoof. The foot plate should be close, nearly touching, the sole of the boot. A little extra room is acceptable as shown above since the top of the foot plate will need to be bent anyway to accomodate the arch of the foot and match the angle of the boot.
One thing you will notice when holding the foot plate up to the base, is that the angle the boot's heel makes with the base is quite a bit less than the angle the back of the hoof wall makes with the base. This is to be expected.
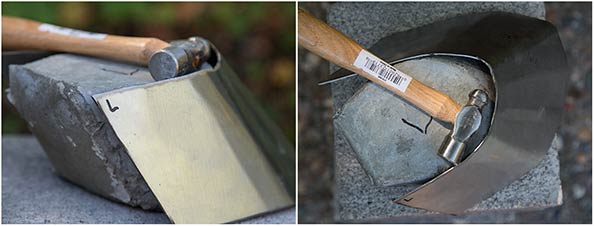
A 6" heel makes about a 45 degree angle with the ground. Conversely, the hoof wall we just made is at a steeper angle of about 65 degrees. To adjust for this disparity, we will need to slightly curve the foot plate outwards. Additionally, we'll need to curve the middle of the foot plate slightly inwards to better conform to the arch of the foot.
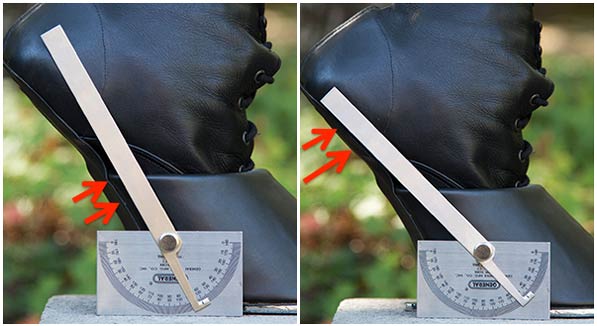
The angle the back of the hoof portion makes with the ground, 62 degrees (left pane above), is quite a bit steeper than the angle that the back of the boot portion (where the heel would normally be) makes with the ground, which is only 45 degrees (right pane above). Thus, you will need to curve the foot plate (metal plate that goes at the back of the hoof and to which the boot will be attached). This curvature will also allow you to accomodate the arch of the foot.
Before welding the foot plate, add the mild curvature to accomodate the arch of the foot. I did this by bending the foot plate slightly around a short length of steel pipe (a couple inches in diameter). Then, I bent the foot plate outwards a little at the point where it will extend upwards beyond the hoof wall.
Note: This is the point at which I decided to switch to a single 1/8" thick foot plate. If you elect to stay with 2 x 1/16" foot plates per boot (recommended), make sure you bend them both identically otherwise they will not fit flush against each other.
After bending it to approximately the correct angles, reconfirm than the boot will fit inside it by bringing the foot plate against the hoof wall. The fit should be even better now, with the foot plate following the angle of the hoof wall on the lower half and then bending slightly to follow the shallower angle of the boot above the point where the hoof wall ends.
Also confirm that the boot will fit into the top of the hoof with the foot plate in place. Hold the foot plate in place flush against the back of the hoof wall, and insert the boot into the top of the hoof. You should be able to get the boot into the hoof without moving the foot plate away from the back. If you cannot fit it in, you will have to bend the top of the hoof wall outwards slightly to make sufficient room. You can do that by locally heating the hoof wall at the top with a blowtorch and using a sheet metal seamer or pliers to bend the top slightly outwards.
When you are satisfied that the foot plate conforms well to the boot (and still fits well with the back of the hoof) and that you will be able to fit the boot into the hoof after the foot plate is welded in place, go ahead and weld the foot plate to the hoof. Weld on the inside of the hoof.
You will want to get a good, strong weld here since this will be supporting weight. Weld along both sides where the foot plate(s) contact the hoof wall and at the bottom where the foot plate(s) contact(s) the base of the hoof.
Let the metal cool, then make sure the boot will fit inside the hoof. It should, but if for some reason it does not, you can try to widen the opening a little by heating and bending the metal outwards. Also check the position of the top of the foot plate with the sole of the boot. The top of the foot plate should not extend beyond the back of the boot (where the back of wearer's foot would be). If it does, shave off the extra metal with the flap disc.
Go over the the welded hoof with the grit disc to shine it up a little and clean up the outside junction of the foot plate. This is mostly cosmetic, but it also allows you to see if the surface is smoothly curved and free from any major defects. Inspect the newly welded joint and make sure it looks good.
If you have a Dremel or similar tool, use an abrasive attachment rated for metal to grind down any sharp points or metal spatter inside the hoof.
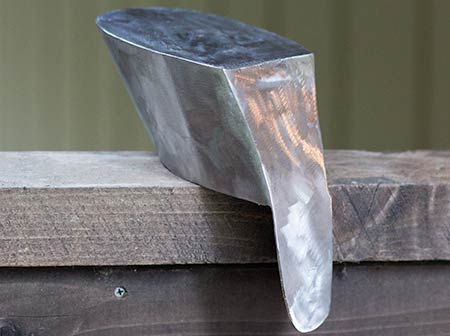
All three portions welded together with the welds cleaned up and the whole thing given a rough polish.
With the metal hoof portion succesfully assembled, repeat the process for the second hoof, then it's time to move on to step 3, assembling the boot. Don't worry though, if you made it this far, you are very nearly done!
Stage 3: Attaching Uppers to Hoof and Finishing with LeatherPlace the boot in the hoof, and triple check that it fits well. Pay attention to the position of the foot plate relative to the sole of the boot. The foot plate should be flush against the bottom of the boot from where the foot plate extends past the top of the hoof wall all the way to where it ends, just before the very back of the boot.
When you're sure that the boot fits well in the hoof and flush against the foot plate, move on to the applying the glue. Once you glue the boot in place, it will be very difficult to remove and reposition.
Outside, or in a well-ventilated area, apply a medium-thick coating of the Barge cement (you may need to use a different adhesive if the bottoms of the boots are not leather) to the bottom of the heelless boot. Let it dry for a few minutes (maybe 10 minutes), then carefully place the boot inside the metal hoof. Bring the back of the boot flush against the foot plate and apply a couple clamps to hold the boot against the foot plate. Use a third clamp to hold the front (toe part) of the boot against the bottom of the metal hoof. Repeat this for the second boot and hoof, and then leave them overnight for the adhesive to dry and harden.
The next day, after the Barge cement has cured, remove the clamps and test the strength of the bond for both hooves. If the adhesive cured well and boots are securely attached the metal hooves, move on to the next step (if not, you will have resand the bottom of the boots and re-apply the adhesive).
Now that the boot uppers are attached to the hooves, it's time to cover the metal with leather. To accomplish this, we will cut three sections of leather to cover each of the three parts of the hoof: the back of the foot plate, the front of the hoof wall, and the bottom of the base. Hot glue will be used to secure the leather to the metal.
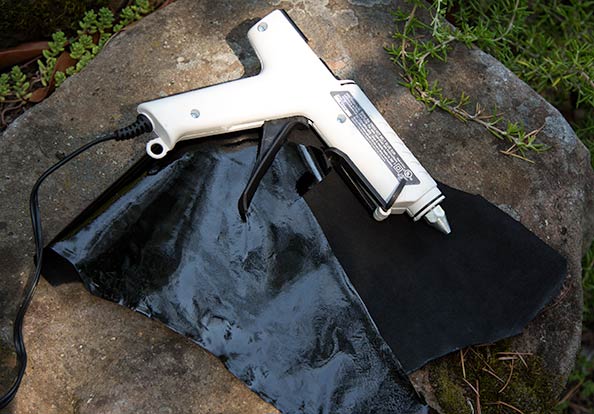
Leather to match the color and style of the boot uppers (patent in this case) and a hot glue gun for attachment to the hoof.
You can use the stencils created previously from the construction paper mockup (the same ones used to trace the pieces onto the steel). However, personally, I found it a little easier to successively drape the leather around each portion of the hoof and mark off the dimensions (with something that can be easily wiped off and will not leave permanent marks).
For the leather that will cover the front of the hoof wall, you will want to cut a piece of leather bigger than the dimensions of the hoof wall because some of the leather will be tucked around the rim and into the hoof.
For the hoof wall especially, make sure you have a wider swath than you anticipate needing. You will need extra material at the top especially, which will be tucked into the hoof and glued in place.
You should also cut the other two portions a little bit bigger than required, but for the leather covering the base and the foot plate, pretty much all (except for about half an inch) the excess leather will be trimmed off with an X-acto knife once they're glued in place. Those sections are form fitted in the final boot with pretty much no excess leather showing.
Start off with the leather that will cover the hoof wall. You can use the stencils to trace out the dimensions and use your eye to judge how much extra you'll need, or you can drape your leather sheet around the hoof wall. Hold it tightly and mark off the measurments. You will need it to cover the front of the hoof wall plus 1/2 inch extra around both sides of the back where it will fold over onto the foot plate, 1/2 inch extra where it folds under onto the base, and about 1.5 inches extra where it fold around the rim of the hoof wall into the hoof itself.
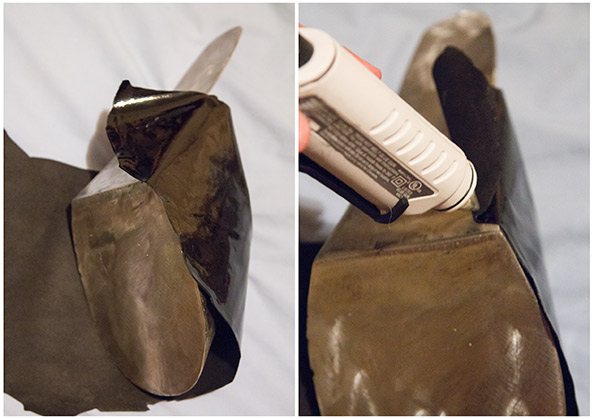
When you have an appropriate sized piece of leather, hold it snug around the hoof wall, and start by gluing one end of it to the rear of the foot plate. Apply hot glue along the 1/2 inch margin at one end, press it firmly onto the rear of the foot plate and wait for the glue to cool and harden as shown in the photo below.
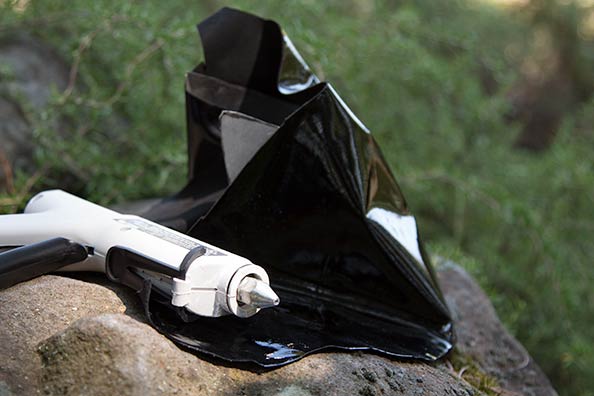
Wrap the leather around the hoof and then use the hot glue gun to attach the leather to the metal at the edges.
Pull the other end so that the leather is snug and lies flat against the front of the hoof wall. It should be free of wrinkles and creases. Then, apply hot glue to the end (opposite the one you glued above) along its length and press it against the rear of the foot plate at the other end like you did for right side above.
With both ends of the leather secured, work your way along the bottom edge of the hoof. Gently pull, taking care to keep the leather flat and free of wrinkles, the bottom of the leather around the bottom of the hoof, and glue it to the base. Work in stages to maintain a smooth curve along the bottom front of the boot.
Finally, apply a little bit of hot glue along the top edge of the leather, and pulling it snug, pull it over the rim and inside the hoof, gluing it to the inside front of the hoof wall. The front of the hoof should now be covered in leather.
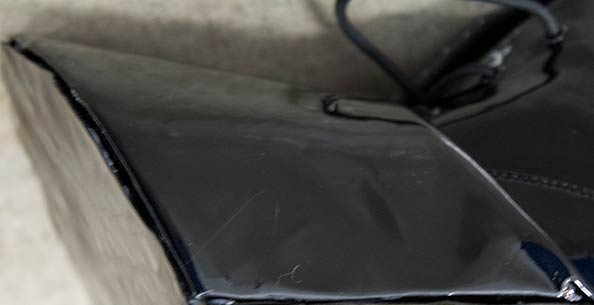
The hoof wall should now be covered in leather, which is glued to the hoof solely along its perimeter. At the bottom, you can see I did not do a perfect job of keeping the leather flush against the curve of the boot - a little tenting/pinching is visible.
Next we'll apply the leather to the foot plate and the base. These two are fairly easy. For the foot plate, make sure the leather is only slightly wider than the foot plate, especially near the top (because we want a very small amount to bend upwards and mask the metal foot plate). Apply hot glue at the very edge of the piece of leather all the way around its perimeter, and carefully place it agianst the foot plate. Keep the leather aligned with the foot plate until the glue hardens. Trim any excess leather on the foot plate with an X-acto knife so the leather appears fitted to the back of the hoof.

Use hot glue around the very edge of the foot plate to cover the back of it in leather. Trim off any excess so the leather appears form fitted to the back of the hoof boot.
Now, do the same for the leather that will cover the base: apply hot glue all the way along its perimeter and hold it against the base, keeping it properly aligned, until the hot glue hardens.
Finally, use your X-acto blade to carefully trim off any extra leather that extends outwards from the base. Set the hoof boot down on the base and try to trim off any extra leather that is visible when looking down at the boot.
Use hot glue around the very edge of the bottom of the base to cover it in leather. Similarly to the foot plate, trim off any excess so the leather is form fitted to the bottom of the base.
That completes the hoof boot with the exception of horseshoes. If you don't want to add horseshoes to the boots, then you can stop here.
Stage 4: Add Balancing Bars to the Horseshoes and Attach to Hoof with ScrewsAs a side note, you can use rubber horseshoes if you'll be using the boots on slipperly surfaces or surfaces that may be damaged by metal shoes (e.g. hardwood floors). Personally I use metal shoes and cover them with a rubber horse boot (such as the Davis boot or a barefoot boot designed for use on horses that don't have shoes) when on hardwood, but I know this is not as aesthetically pleasing as using a rubber shoe.
The shoes used on the Reactor boots have what I call a "balancing bar", which is a "T" shaped piece of metal attached to the shoe such that a length of metal extends behind the shoe. This aids in balancing in the heelless boots. If you prefer to use shoes without the balancing bar, you can skip this step. Personally, I have two pairs of shoes to use with these hoof boots: one with the balancing bar and one without. The latter is especially useful when wearing a Davis boot over the hoof. Also, since horseshoes are often sold in packs of 4, the added cost of having both styles is minimal.
The correct size shoe for this boot is going to be about a 4 or 5 with toe clips, but I chose to use a size 1 without toe clips initially since that's available from many tack stores off the shelf. If you're in doubt of what size shoe you need for your completed boot, simply measure the bottom of the hoof portion of your boot and compare it to a horseshoe size chart.
Anyway, constructing and adding the balancing bar is relatively easy. I used a length of 3/16" x 5/8" rectangular steel bar (assuming you're using a steel horseshoe; if you're using an aluminum shoe, you will likely want to use aluminum bar), but the important thing here is to choose a thickness of steel that is not more than the thickness of the shoe you're using otherwise it may not be flush with the surface of the shoe, impeding balance. Most shoes are around 1/4" thick, so 3/16" is usually a reasonble choice.
You will want to cut two sections per shoe: one 2" long (this one will extend back from the shoe), and a second one a little over 3" long (this one will attach to both sides of the shoe). The precise measurement for that second bar will depend on the horseshoe size, but simply hold it against the shoe about 1" from the back and measure/mark off the length as shown in the photo below.
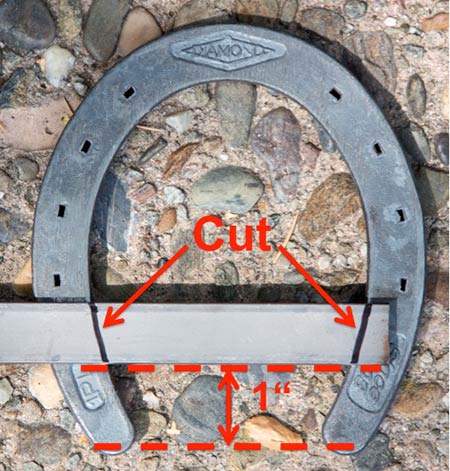
Mark off where you will cut the length of steel bar that will form the top of the "T" of the balancing bar, which attaches to both sides of the horseshoe (the second length of steel that extends back from the shoe will attach to the middle of this bar as well). You should measure the length 1" from the back of the shoe as shown here.
Put the horseshoe with the back (the side that attaches to the hoof) facing you as shown in the photo above and below on a flat surface. You want the metal that will become the balancing bar to be flush with the bottom (walking surface) of the horseshoe.
Take the two lengths of flat steel bar that you cut earlier, and first align the horizontal one (the one you cut according to the width of the horseshoe as shown in photo above) about an inch from the back of the horseshoe. Weld it to the horseshoe at both ends (welds 1 and 2 in photo below). After you have welded the horizontal bar in place, take the other length of flat steel bar (should be about 2 inches long), and place one end against the middle of the horizontal bar that you just welded to the horseshoe, and weld it into place (weld 3 in photo below). Repeat for the second horseshoe.
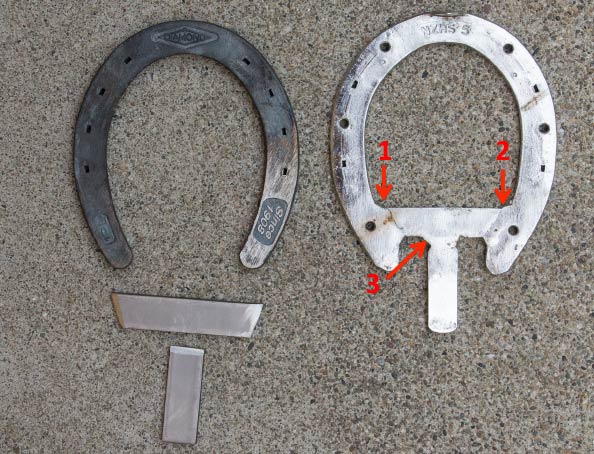
Weld the balancing bar to the horseshoe (from the back of the shoe). First weld the edges of the horizontal bar to the horseshoe (welds 1 and 2 shown in this photo), then weld the bar that extends back from the shoe to the center of the horizontal bar (weld 3 in this photo).
With the welds completed and the balancing bars securely attached to the horseshoes, use the flap disc on the grinder to clean up the welds on the front and back of the horseshoes around the balancing bar. It's especially important to clean up the bottom of the shoe because this side will contact the ground and any imperfections can impair balance.
While you have the flap disc on the grinder, round out the back corners of the balancing bar so they don't have sharp edges. This is partially cosmetic and partially functional (the back of the balancing bar will be less likely to catch on something with rounded edges).
Use the flap disc on the grinder to clean up the welds you just made to attach the balancing bar to the horseshoe. Run the flap disc on both the front and back of the shoe.
Now run the flap disc over the entirety of the walking surface of the horseshoe to make sure its flat and doesn't have any little blobs of metal from the earlier weld. Also, it makes the horseshoe shiny!
I ran the flap disc over the bottom of the horseshoe (the side that will contact the ground) to make sure the walking surface was flat, and also because, well, shiny :)
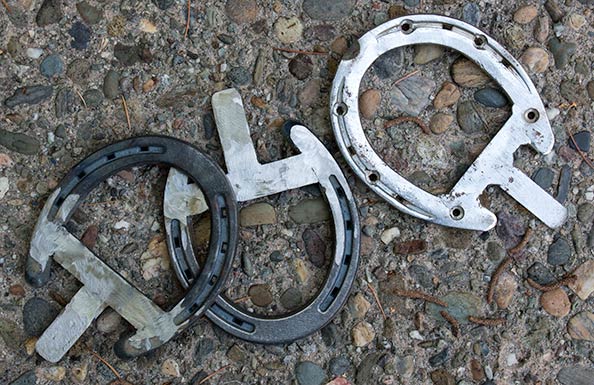
The next step is to decide what size screws you want to use to attach the horseshoes. You have the option to use small screws that fit into the nail holes of the shoe (similar to the Punitive hoof boot - image below right), or to drill holes and use a larger screw as in the Reactor (image below left).
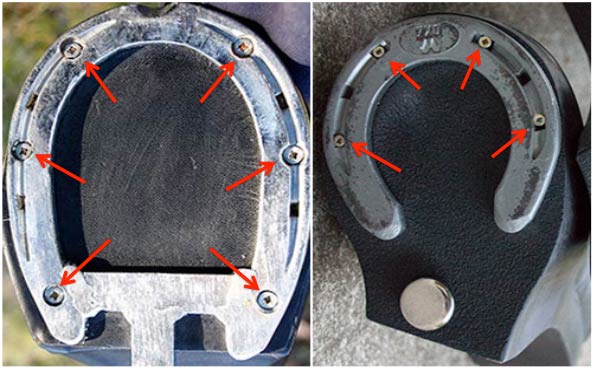
The screws on the Reactor boot (left) are larger and require holes to be drilled in the horseshoe whereas the Punitive boot uses a much smaller shoe (right) and uses correspondingly smaller screws which can fit through the nail holes of the horseshoe without further modification.
You can probably get away with using smaller screws, but the boot we are making here uses a much larger shoe than the Punitive boot (size 5 versus 7X0), so I would recommend drilling holes and using larger screws, but it's your call.
I opted for a similar attachment method as the Reactor boot, using six #6 x 5/8" Philips screws per shoe. To use the #6 Philips head, drill six holes per shoe with a 9/64" bit, roughly evenly spaced, then use a countersink bit (1/4", 82 degree angle) so that the heads of the screws are recessed.
When using the countersink bit, only drill deep enough to fully recess the head of the screws. Do not drill all the way through the horseshoe with this bit otherwise the screw will simply fall through the hole. I highly recommend that you recess the heads of the screws with the countersink bit. If you don't, the heads of the screws will protrude and possibly impede balance/traction/etc.
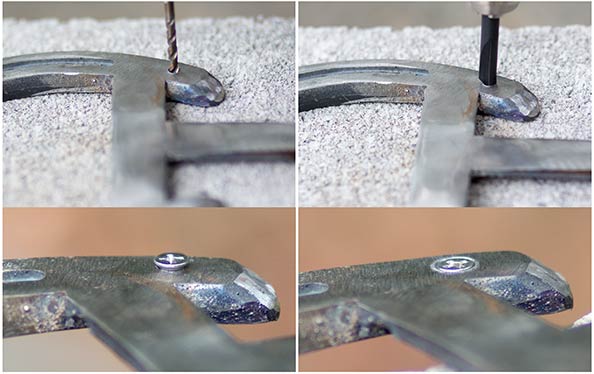
First, drill 6 holes in the horseshoe sized for the screw you are going to use. In this case, like the Reactor boot, I used a #6 Philips head (5/8" length), which required me to drill a hole with a 9/64" drill bit (top left). However, this results in the head of the screw protruding from the shoe (bottom left). Therefore, I used a countersink bit to widen the top of the hole (top right). This allows the head of the screw to become flush with the bottom of the shoe (bottom right).
With the holes drilled and countersunk in the horseshoes, hold them against the bottom of the hoof boots. You will now want to drill holes in the bottom of the boots to attach the horseshoes (I know it pains me too to drill holes in the nice new boots we just spent hours making, but what can you do). Personally, I used a small amount of hot glue (can you tell I'm a fan of hot glue?) to temporarily hold the horseshoes in place while I drilled matching holes in the bottom of the boot (by running the drill bit through the holes in the horseshoe), but if you feel like you have a steady hand and can keep the horseshoe and boot stationary, go that route and save yourself the hassle of cleaning up the glue.
For drilling the holes into the bottom of the hoof, I used a 7/64" bit. This creates a pilot hole that the screw can then screw into. We did not need to do this for the horseshoe because the head of the screw will hold the horseshoe in place, but here we need the hole to be smaller than the screw shaft's diameter, so the screw can "bite" into it to hold itself and the horseshoe in place.
Holding the horseshoe stationary against the bottom of the hoof boot in the position you want it in, drill (with a slightly smaller bit, 7/64", than we used earlier to drill the initial screw holes in the horseshoe), insert it in one of the horseshoe's screw holes and carefully drill through the bottom of the hoof. Repeat this process for all 6 holes per boot to create matching holes in the hoof. I found that it was useful to insert and tighten a screw into each hole as soon as I finished drilling it. This helped to keep the horseshoe in place as I drilled subsequent holes.
Once you're done drilling matching holes in the hoof, insert and screw in all the attachment screws (if you did not already do so as you were drilling the holes). There's no need to make them super tight, but tight enough that they won't come loose during normal activity. You don't want your pony to lose a shoe :)
After using screws to attach the horseshoes to the bottom of each hoof, that's it. They're finally finished (yay)!
Now it's time to admire your handiwork!
You're now done! Enjoy your new hoof boots - though be careful walking in them. The Kaysers/Reactor hoof boot (left) in comparison to the boot I - and hopefully you as well - made (right) as described in the above article.