My Hoof Boot Project (Part 1)
DIY Hoof Boots for Ponyplay - Part 1
Written by cPony on
Last updated on
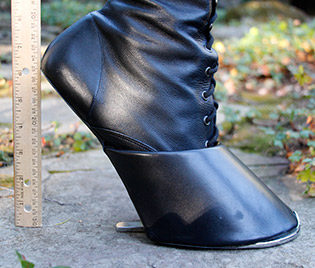
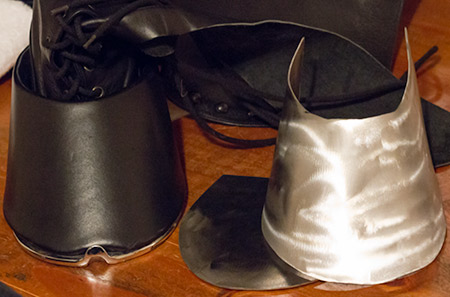
Side view of my Reactor hoof boot (men's size 11) with a ruler for scale.
Update: Here is the complete tutorial for making your own Reactor style hoof boots (with printable stencils for each portion of the hoof included).
The last few months have had me feeling a little crafty - I'm planning to finish a couple open pony play related projects in the next few months (including my custom shock collar and training app for ponyboys) and start a few more - so I thought it might be fun to take a close look at my pair of Reactor boots and see how easy it would be to emulate the design.
Let me start off with a brief description of the Reactor pony boot. It essentially consists of two parts: a leather boot portion (knee height for the pair I own), and a "hoof" portion, which is made of leather covered metal. The leather boot is inserted into the hoof and fastened in place (with leather glue as far as I can tell).
My plan is to make these two parts separately and join them in a similar manner. I'm going to start off with the hoof portion and make the leather boot portion later in part 2 (mostly because it's easier for me to go out and buy steel from a hardware store than it is for me to buy leather). I was also thinking that it might be cool to make a slightly smaller hoof portion for use as hand hooves - the metal would completely prevent the wearer from using his fingers.
Now, I don't want to take apart the boot since I only have the one pair and I really like them, which makes things a little more challenging. However, after examining the hoof portion closely, I can see that it's constructed of three separate pieces of metal welded together:
- The bottom of the hoof, which is flat and roughly U shaped.
- The front of the hoof, which is highly curved around the foot and also has a slight curve up and down.
- The back plate which supports the bottom of the wearer's foot and has a very slight curve to it.
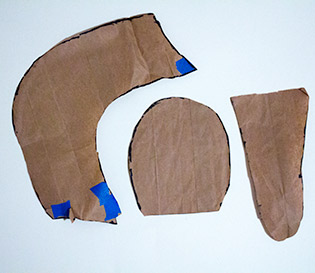
Paper tracings of hoof shapes.
After inspecting the hoof, my next step was to roughly trace an outline of each of the parts of the hoof (ideally, I would make a mold using silicone RTV (which can be mild enough to use on leather with a thin coat of Vaseline to prevent it adhering), but I didn't have any of the molding material at hand) onto some paper, cut out the shapes, and trim them as best I can to the correct size and shape.
Before moving to metal, I wanted to make sure I was in the ballpark with these paper outlines, so I used them to trace identical shapes on construction paper (actually somewhat difficult since the leather uppers kept getting in the way, and it was difficult to trace the edges due to the curvature) and cut out the tracings.
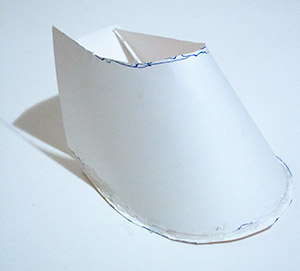
Hoof shape test using construction paper.
Using a hot glue gun, I glued the paper pieces together to make sure the dimensions were approximately correct and everything fit into roughly the right shape. It wasn't the prettiest thing in the world, but everything fit together reasonably well so I decided to move on and give it a try with steel.
The next question was what thickness of steel to use. This was quite difficult to measure since leather was covering the metal, but with some gentle poking and prying, I lifted a small section of leather and found the thickness of the metal used to be 1/16", which, as it turns out, is 16 gauge. The only exception was the foot plate at the back of the boot, which is constructed of two pieces of 1/16" steel to make 1/8" total thickness.
With these measurements in hand, I went off to the hardware store and picked up some 16 gauge sheet steel (from the tracings, I calculated I would need a square foot or so, but I bought extra just in case), which isn't terribly expensive.
Anyway, using the paper shapes I made earlier, I traced the three sections onto the steel plate, and carefully cut them out. I just used a 4 1/2" angle grinder with a cutoff disc (if you decide to go this route, do be very careful and wear appropriate safety gear) because I don't own a plasma cutter and 16 gauge steel is probably at the very edge of what you want to do by hand (e.g. using shears or a hand saw).
I chose to only cut one foot plate initially in case I measured wrong. After cutting out each of the shapes, I switched to a grinding disc to fine tune each piece so it matched the paper tracings as closely as possible and to remove any sharp edges.
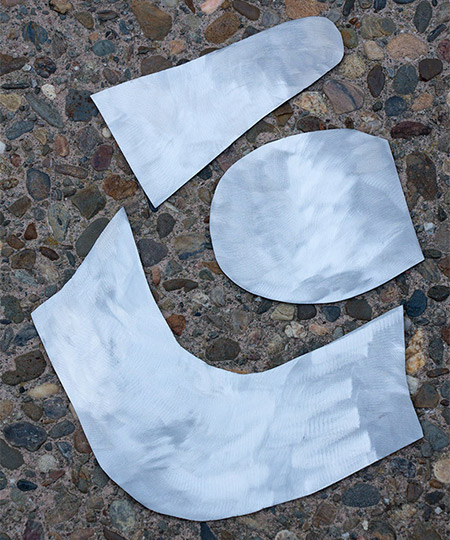
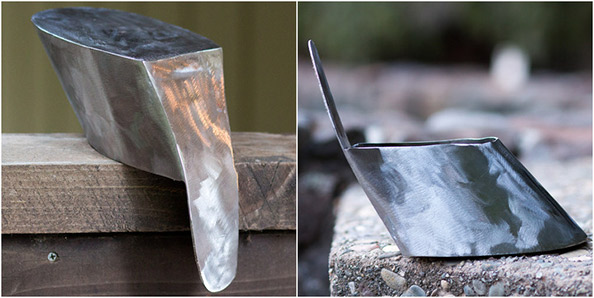
The steel cutouts of the three sections of the hoof portion of the boot. It's hard to tell if they will fit together properly, but at least they match the paper tracings.
The next step was to bend the front portion of the hoof into the correct shape. This turned out to be the hardest part because the front is curved in more than one dimension. I ended up having to use one of my Reactor boots as a base around which to bend the steel. I will definitely have to make a cast to use in the future, so I don't damage my boots.

Shaping the front of the hoof to achieve the correct curvature in both dimensions.
Here's a second view of the curved front of the hoof compared to the Reactor boot:
Second view of the curve of the front of the hoof in comparison to the original boot.
With the front section of the hoof curved to my liking, I welded it to the flat bottom plate first (I used a MIG welder because that's what I have, but I expect you could use pretty much anything for this thickness of steel). I figured welding the back foot plate should be the final step because it would limit my ability to easily reach inside the hoof. Plus, doing the back part last would make it easier to get the angle of the heel correct.

Front of the hoof welded to the bottom. I chose to weld these first since doing the back first would make it difficult to access the inside of the hoof.
After welding the front of the hoof to the bottom, I welded the back foot plate into place. This went easier than I originally expected and pretty soon I had all three sections welded together. As a final step, I used the grinder to clean up all the edges and gave the whole thing a once over with a 36 grit flap disc so it was a little more shiny :) The result is a not too shabby looking hoof portion ready to be covered in leather and made into a boot (or glove):
All three portions welded together with the welds cleaned up and the whole thing given a rough polish.
My next step will be twofold: make the leather boot portion and create a mold of the existing boot's hoof portion so I can have a high quality master and not have to work with the boot itself (and risk damaging it) in the future.
In part 2, I will go over covering the hoof portion in leather, adding the horseshoe (and optionally adding a balancing bar to the horseshoe) and constructing the boot portion.
Update: The full tutorial on making a pair of Reactor-like hoof boots is now available here.